-
[Kubernetes] Horizontal Pod Autoscaler인프라/Kubernetes 2020. 11. 25. 15:56
Horizontal Pod Autoscaler 연습
Horizontal Pod Autoscaler는 CPU 사용량(또는 베타 지원의 다른 애플리케이션 지원 메트릭)을 관찰하여 레플리케이션 컨트롤러, 디플로이먼트, 레플리카셋(ReplicaSet) 또는 스테이트풀셋(StatefulSet)의 파드
kubernetes.io
이번시간은 AutoScaling 방법 중 하나인 HPA에 대해 알아볼 것이다.
HPA는 CPU 사용량 (다른자원도 beta지원)을 기반으로 replication controller, deployemt, replica set or stateful set 등으로 Pod의 갯수를 auto scaling하는 기능이다.
시작하기전에 1.2v 이상의 쿠버네티스 클러스터, kubectl이 필요하고 자원을 모니터링할 Metrics server가 필요하다.
쿠버네티스 클러스터, kubectl은 이전의 챕터를 겪고나면 자동으로 깔려있으니 Metrics server를 설치해보자.
kubernetes-sigs/metrics-server
Cluster-wide aggregator of resource usage data. Contribute to kubernetes-sigs/metrics-server development by creating an account on GitHub.
github.com
kubectl apply -f https://github.com/kubernetes-sigs/metrics-server/releases/latest/download/components.yaml위의 명령어를 적용시키면 yaml에 등록되어있는 많은 설정들이 적용된다!
kubectl get pods -A -o wide
실행중이나 READY 상태가 아니다.
kubectl logs pod/metrics-server-5d5c49f488-v5kdn -n kube-systemkubectl logs명령어로 pod를 확인해봤을 때 아래와 같은 cannot validate certificate 오류가 발생하는데
E1125 03:23:16.248131 1 server.go:132] unable to fully scrape metrics: [unable to fully scrape metrics from node kube-node1: unable to fetch metrics from node kube-node1: Get "https://192.168.5.2:10250/stats/summary?only_cpu_and_memory=true": x509: cannot validate certificate for 192.168.5.2 because it doesn't contain any IP SANs, unable to fully scrape metrics from node kube-node2: unable to fetch metrics from node kube-node2: Get "https://192.168.5.128:10250/stats/summary?only_cpu_and_memory=true": x509: cannot validate certificate for 192.168.5.128 because it doesn't contain any IP SANs, unable to fully scrape metrics from node kube-master: unable to fetch metrics from node kube-master: Get "https://192.168.5.1:10250/stats/summary?only_cpu_and_memory=true": x509: cannot validate certificate for 192.168.5.1 because it doesn't contain any IP SANs]이는 https, 인증서 관련 오류인 것으로 보인다.
kubectl edit deployment metrics-server -n kube-systempod를 정상화하기위해 deployment 설정파일을 열어서 containers의 args에 아래를 추가하자
- --kubelet-insecure-tls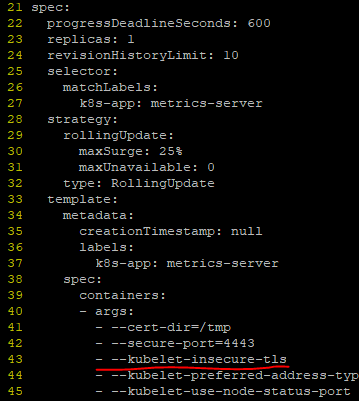
그럼 자동으로 RollingUpdate type에 의해 기존 pod는 삭제되고 새로운 metrics-server pod가 생성되게 된다!


Running 확인!
깃허브의 내용을 보면
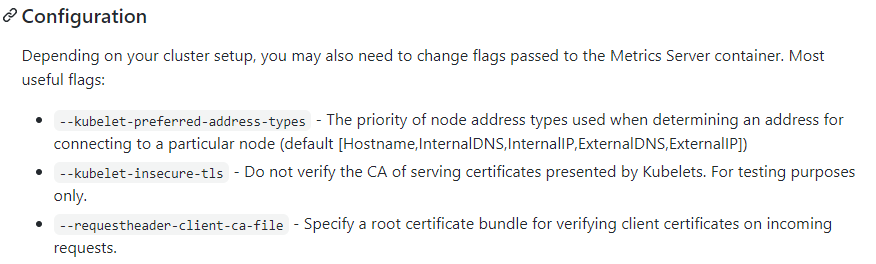
setup할 때 변경이 필요한 Configuration에 대해 설명해 주고 있다.
metrics-server가 https로 통신을 해서, 인증서가 필요하여 발생했던 오류인 것으로 보인다.
그래서 --kubelet-insecure-tls 인자를 이용해서 무시하니 성공했던 것 같다.
test용도로만 사용하라고 하는데 이후에 ca까지 등록하는 과정도 겪어봐야 할 것 같다.
metric 서버가 설치되었기 때문에 아래의 명령어로 연결되어있는 Node의 시스템 자원을 확인할 수 있다.
kubectl top nodes
metrics-server를 설치하고 난뒤에 php-apache 웹서버를 설치하여 부하를 준 다음 autoscaling을 테스트해 볼것이다.
apiVersion: apps/v1
kind: Deployment
metadata:
  name: php-apache
spec:
  selector:
    matchLabels:
      run: php-apache
  replicas: 1
  template:
    metadata:
      labels:
        run: php-apache
    spec:
      containers:
      - name: php-apache
        image: k8s.gcr.io/hpa-example
        ports:
        - containerPort: 80
        resources:
          limits:
            cpu: 500m
          requests:
            cpu: 200m
---
apiVersion: v1
kind: Service
metadata:
  name: php-apache
  labels:
    run: php-apache
spec:
  ports:
  - port: 80
  selector:
    run: php-apache
kubectl apply -f https://k8s.io/examples/application/php-apache.yamldeployment.apps/php-apache created
service/php-apache created
위와 같이 deployment, service가 생성된다.
kubectl autoscale deployment php-apache --cpu-percent=50 --min=1 --max=10horizontalpodautoscaler.autoscaling/php-apache autoscaled
위의 명령어로 방금 설정한 php-apache deployment에 autoscale을 설정한다! hpa가 기본적으로 적용된다.
--cpu-percent=50 는 deployment/php-apache가 container를 생성할 때 사용할 수 있는 cpu자원할당량의 50%를 넘으면 autoscale을 한다는 의미이다.
그리고 --min ~ --max 까지 autoscaling 한다는 뜻이다.
spec.containers[].resources.requtes.cpu : 200m
spec.containers[].resources.limits.cpu : 500m 라고 위에 설정이 되어있는데
이 수치의 의미는 cpu core 1개의 자원을 1000millicores라는 절대적인 수치로 나타낸 값이다.
결국 현재 Slave Node의 환경은 총 2대(kube-node1, kube-node2)인데 각각 cpu core를 2개씩 잡아놓았다.
kube-node1 = 2000m 사용가능
kube-node2 = 2000m 사용가능
php-apache container가 1대마다 200m의 cpu core 자원을 사용할 수있는데 이 200m의 50%인 100m을 넘어가게 사용하면 autoscaling이 진행된다는 의미이다!!! 물론 kube-node1, kube-node2 중 cpu core 자원을 할당해 줄 수 있는 녀석에게 고르게 분배할 것이다.
아래의 명령어를 통해 생성된 hpa 를 볼 수 있다.
kubectl get hpa
현재 TARGETS pod들의 총 cpu사용율의 평균 0% / autoscale 시작 cpu사용율 50%, REPLICAS 현재 1대 실행중
그럼 이제 부하를 발생시켜서 실제 autoscaling이 되는 과정을 살펴보자!
kubectl run -i --tty load-generator --rm --image=busybox --restart=Never -- /bin/sh -c "while sleep 0.01; do wget -q -O- http://php-apache; done"다른 터미널을 한개 더 열어서, 위의 busybox 이미지를 사용해 0.01초 마다 php-apache서버로 request를 날리는 scripts를 실행하여 부하를 주자!

위와같이 OK! 가 계속 뜨면서 php-apache가 request에 의해 CPU를 점유할 것이다!
그리고 조금 기다려보다가 다시 hpa 상태를 보면
kubectl get hpa
250%/50%이 찍혀있는것을 볼 수 있는데 이는 REPLICAS가 1이 었을 때의 값이다.
1대가 250%, 500m의 cpu 자원을 사용하고 있으니 REPLICAS가 5로 늘어난 것이다!
Metrics API design 에 의하면

default로 1분마다 cpu 점유율을 체크한다고 한다.


총 6개 까지 REPLICAS가 실행되었다.
kubectl get deployment php-apache


이렇게 자동으로 scaled 되고 있는 모습을 확인할 수 있다!
Ctrl + c로 busybox를 종료하고난 뒤


cooldown되기까지의 시간이 걸린다.
쿠버네티스 HPA문서 를 참조해서 보면
The Horizontal Pod Autoscaler is implemented as a control loop, with a period controlled by the controller manager's --horizontal-pod-autoscaler-sync-period flag (with a default value of 15 seconds).
kube-controller-namaeger의 --horizontal-pod-autoscaler-sync-period 플래그값 (기본 15초)에 의해 pod가 제어되는 것 같다.
- --horizontal-pod-autoscaler-downscale-stabilization: The value for this option is a duration that specifies how long the autoscaler has to wait before another downscale operation can be performed after the current one has completed. The default value is 5 minutes (5m0s).
또한 너무 잦은 scaling에 의해 thrashing 이 일어날 수 있기 때문에, 지금같은 경우에는 cpu 자원이 50% 이하더라도 즉시 REPLICAS가 줄어드는 것이아니라 default 5분간의 시간이 흐른 뒤에 줄인다고 한다.
문서에는 되도록이면 too long 하게 set 하는것이 좋다고 한다. 빈번한 scale의 변화는 thrashing 으로 인해 성능저하가 발생하기 때문이다.
kubectl describe hpa php-apache
위와같이 6개(32m)에서 1개(24m) 로 줄어든 시간의 차가 8분인데 6개로 늘어나고 몇분 뒤에 busybox를 종료시킨점을 감안하면 cooldown default값인 5분에 해당할 듯 싶다.
추가적으로 apiserver를 통해 metrics-server가 수집하고있는 자원에대해 접근할 수 있다!
proxy를 돌릴 새로운 터미널을 띄우거나 백그라운드로 proxy를 실행하자
# kubectl proxy
Starting to serve on 127.0.0.1:8001
curl을 통해 등록되어있는 api의 목록을 확인해보자
# curl http://127.0.0.1:8001/apis/
{
  "kind": "APIGroupList",
  "apiVersion": "v1",
  "groups": [
    .
    .
    .
    {
      "name": "metrics.k8s.io",
      "versions": [
        {
          "groupVersion": "metrics.k8s.io/v1beta1",
          "version": "v1beta1"
        }
      ],
      "preferredVersion": {
        "groupVersion": "metrics.k8s.io/v1beta1",
        "version": "v1beta1"
      }
    }
  ]
}
APIGroupList에 "metrics.k8s.io"의 이름으로 등록된것이 있는걸 확인할 수있다!
# curl http://127.0.0.1:8001/apis/metrics.k8s.io/
{
  "kind": "APIGroup",
  "apiVersion": "v1",
  "name": "metrics.k8s.io",
  "versions": [
    {
      "groupVersion": "metrics.k8s.io/v1beta1",
      "version": "v1beta1"
    }
  ],
  "preferredVersion": {
    "groupVersion": "metrics.k8s.io/v1beta1",
    "version": "v1beta1"
  }
}
/apis/{name} 으로 범위를 좀 줄여보았다.
# curl http://127.0.0.1:8001/apis/metrics.k8s.io/v1beta1/
{
  "kind": "APIResourceList",
  "apiVersion": "v1",
  "groupVersion": "metrics.k8s.io/v1beta1",
  "resources": [
    {
      "name": "nodes",
      "singularName": "",
      "namespaced": false,
      "kind": "NodeMetrics",
      "verbs": [
        "get",
        "list"
      ]
    },
    {
      "name": "pods",
      "singularName": "",
      "namespaced": true,
      "kind": "PodMetrics",
      "verbs": [
        "get",
        "list"
      ]
    }
  ]
}
/apis/{name}/{version} 으로 접근을 해보니 2개의 resources(nodes, pods)에 접근가능하다!
# curl http://127.0.0.1:8001/apis/metrics.k8s.io/v1beta1/nodes
{
  "kind": "NodeMetricsList",
  "apiVersion": "metrics.k8s.io/v1beta1",
  "metadata": {
    "selfLink": "/apis/metrics.k8s.io/v1beta1/nodes"
  },
  "items": [
    {
      "metadata": {
        "name": "kube-master",
        "selfLink": "/apis/metrics.k8s.io/v1beta1/nodes/kube-master",
        "creationTimestamp": "2020-11-25T08:08:51Z"
      },
      "timestamp": "2020-11-25T08:07:58Z",
      "window": "30s",
      "usage": {
        "cpu": "227653283n",
        "memory": "1219148Ki"
      }
    },
    {
      "metadata": {
        "name": "kube-node1",
        "selfLink": "/apis/metrics.k8s.io/v1beta1/nodes/kube-node1",
        "creationTimestamp": "2020-11-25T08:08:51Z"
      },
      "timestamp": "2020-11-25T08:08:16Z",
      "window": "30s",
      "usage": {
        "cpu": "91030588n",
        "memory": "686112Ki"
      }
    },
    {
      "metadata": {
        "name": "kube-node2",
        "selfLink": "/apis/metrics.k8s.io/v1beta1/nodes/kube-node2",
        "creationTimestamp": "2020-11-25T08:08:51Z"
      },
      "timestamp": "2020-11-25T08:08:39Z",
      "window": "30s",
      "usage": {
        "cpu": "125081591n",
        "memory": "658964Ki"
      }
    }
  ]
}
nodes에 대대한 자원을 확인해보니 위와같이 뜨는것을 확인할 수 있다.
metrics-server가 자원을 수집하는 window 시간이 30초로 되어있다. 그리고 수집한 시간도 표시해주고 있다.
github.com/kubernetes/community/blob/master/contributors/design-proposals/instrumentation/resource-metrics-api.md 문서를 살펴보면 pods에도 접근할 수 있다.
# curl http://127.0.0.1:8001/apis/metrics.k8s.io/v1beta1/namespaces/default/pods
{
  "kind": "PodMetricsList",
  "apiVersion": "metrics.k8s.io/v1beta1",
  "metadata": {
    "selfLink": "/apis/metrics.k8s.io/v1beta1/namespaces/default/pods"
  },
  "items": [
    {
      "metadata": {
        "name": "kubernetes-bootcamp-769746fd4-md22p",
        "namespace": "default",
        "selfLink": "/apis/metrics.k8s.io/v1beta1/namespaces/default/pods/kubernetes-bootcamp-769746fd4-md22p",
        "creationTimestamp": "2020-11-25T08:13:11Z"
      },
      "timestamp": "2020-11-25T08:12:34Z",
      "window": "30s",
      "containers": [
        {
          "name": "kubernetes-bootcamp",
          "usage": {
            "cpu": "0",
            "memory": "11064Ki"
          }
        }
      ]
    },
    {
      "metadata": {
        "name": "kubernetes-bootcamp-769746fd4-mrw8z",
        "namespace": "default",
        "selfLink": "/apis/metrics.k8s.io/v1beta1/namespaces/default/pods/kubernetes-bootcamp-769746fd4-mrw8z",
        "creationTimestamp": "2020-11-25T08:13:11Z"
      },
      "timestamp": "2020-11-25T08:12:16Z",
      "window": "30s",
      "containers": [
        {
          "name": "kubernetes-bootcamp",
          "usage": {
            "cpu": "0",
            "memory": "15892Ki"
          }
        }
      ]
    },
    {
      "metadata": {
        "name": "kubernetes-bootcamp-769746fd4-qp5hz",
        "namespace": "default",
        "selfLink": "/apis/metrics.k8s.io/v1beta1/namespaces/default/pods/kubernetes-bootcamp-769746fd4-qp5hz",
        "creationTimestamp": "2020-11-25T08:13:11Z"
      },
      "timestamp": "2020-11-25T08:12:29Z",
      "window": "30s",
      "containers": [
        {
          "name": "kubernetes-bootcamp",
          "usage": {
            "cpu": "0",
            "memory": "10536Ki"
          }
        }
      ]
    },
    {
      "metadata": {
        "name": "kubernetes-bootcamp-769746fd4-stnxw",
        "namespace": "default",
        "selfLink": "/apis/metrics.k8s.io/v1beta1/namespaces/default/pods/kubernetes-bootcamp-769746fd4-stnxw",
        "creationTimestamp": "2020-11-25T08:13:11Z"
      },
      "timestamp": "2020-11-25T08:12:12Z",
      "window": "30s",
      "containers": [
        {
          "name": "kubernetes-bootcamp",
          "usage": {
            "cpu": "0",
            "memory": "10104Ki"
          }
        }
      ]
    },
    {
      "metadata": {
        "name": "php-apache-d4cf67d68-nmrsx",
        "namespace": "default",
        "selfLink": "/apis/metrics.k8s.io/v1beta1/namespaces/default/pods/php-apache-d4cf67d68-nmrsx",
        "creationTimestamp": "2020-11-25T08:13:11Z"
      },
      "timestamp": "2020-11-25T08:12:33Z",
      "window": "30s",
      "containers": [
        {
          "name": "php-apache",
          "usage": {
            "cpu": "40429n",
            "memory": "18004Ki"
          }
        }
      ]
    }
  ]
}
이렇게 간단하게 한번 HPA에 대해 알아보았다.
연습이다보니 command를 통해서 진행했는데 좀더 복잡한 옵션 값을 통해 쿠버네티스 환경을 조작하려면 .yaml파일에 대한 스펙을 빠른 시일내에 공부해야할 듯 싶다.
그럼 끝!
'인프라 > Kubernetes' 카테고리의 다른 글
[Kubernetes] Visual하게 DashBoard를 설치, 접속해보자 (2) 2020.11.26 [Kubernetes] 설치 명령어 모음 (0) 2020.11.26 [Kubernetes] 쿠버네티스 설치하기 (7) - Performing a Rolling Update (0) 2020.11.23 [Kubernetes] 쿠버네티스 설치하기 (6) - Running Multiple Instances of Your App (0) 2020.11.20 [Kubernetes] Service Cluster IP란? Kubernetes Network? Kubernetes iptables? (0) 2020.11.19