-
[Kubernetes] 쿠버네티스 설치하기 (4) - Deploy an app인프라/Kubernetes 2020. 11. 16. 15:26
이전 시간까지 Master Node 1대, Slave Node 1대를 설치였다!
시작하기에 앞서서 쿠버네티스가 container runtime 환경에서 동작한다는 의미를 눈으로 직접 확인해보자
[Master Node]
docker ps
Master Node에서 Docker에 의해 떠있는 container 목록이다!
- calico-kube-controllers
- calico-node
- coredns
- kube-proxy
- kube-apiserver
- kube-scheduler
- kube-controller-manager
- etcd
[Slave Node]

- calico-node
- kube-proxy
아래의 쿠버네티스 컴포넌트들에 대해 설명하고있는 것과 대부분이 일치하고있다!!
Kubernetes Components
A Kubernetes cluster consists of the components that represent the control plane and a set of machines called nodes.
kubernetes.io
공통적인 부분을 살펴보자면 각 container에는 POD라는 이름이달린 container가 존재한다는 것이다!
running 중인 container중에 kubelet이 없는것을 볼 수 있는데, 이는 container들을 Pod안에서 동작시키기 위한 agent여서 host pc의 service로 실행되고 있다
kubelet.service가 실행될 때 이러한 log가 보이는 것을 확인할 수 있다.

어떤내용인지 잘 모르겠으나 ipam (ip address management)가 사용하는 network를 172.168.0.128/26 사용한다는 것 같고 현재 1개의 ip 172.16.0.131/26를 할당했다고 하는 것 같다.
10101100 . 00010000 . 00000000 . 10 000000 172.16.0.128 / 26
그러니까 000000 (0) ~ 111111 (63) 개, 64개 의 ip중 000011 (3) 3번째 녀석을 할당한 것이다.
ps. 0은 네트워크 주소라고 치면 63개라고 해야할까
아마 172.16.0.128을 기준으로 아래는 pod에, 위로는 control-plane에 할당하는 것 같다. 느낌이다...

현재 172.16.0.131 ip를 사용하는 녀석은 Calico CNI 였다!
결국 172.16.0.128/26 네트워크 안에서 컨테이너들 끼리 통신이 가능하다는 의미인 것 같다.
이젠 직접 Slave Node에 app을 배포해보자!
App 배포하는 튜토리얼
Interactive Tutorial - Deploying an App
A Pod is the basic execution unit of a Kubernetes application. Each Pod represents a part of a workload that is running on your cluster. Learn more about Pods. To interact with the Terminal, please use the desktop/tablet version Continue to Module 3›
kubernetes.io
유스케이스
다음은 디플로이먼트의 일반적인 유스케이스이다.
- 레플리카셋을 롤아웃 할 디플로이먼트 생성. 레플리카셋은 백그라운드에서 파드를 생성한다. 롤아웃 상태를 체크해서 성공 여부를 확인한다.
- 디플로이먼트의 PodTemplateSpec을 업데이트해서 파드의 새로운 상태를 선언한다. 새 레플리카셋이 생성되면, 디플로이먼트는 파드를 기존 레플리카셋에서 새로운 레플리카셋으로 속도를 제어하며 이동하는 것을 관리한다. 각각의 새로운 레플리카셋은 디플로이먼트의 수정 버전에 따라 업데이트한다.
- 만약 디플로이먼트의 현재 상태가 안정적이지 않은 경우 디플로이먼트의 이전 버전으로 롤백한다. 각 롤백은 디플로이먼트의 수정 버전에 따라 업데이트한다.
- 더 많은 로드를 위해 디플로이먼트의 스케일 업.
- 디플로이먼트 일시 중지로 PodTemplateSpec에 여러 수정 사항을 적용하고, 새로운 롤아웃의 시작을 재개한다.
- 롤아웃이 막혀있는지를 나타내는 디플로이먼트 상태를 이용.
- 더 이상 필요 없는 이전 레플리카셋 정리.
아래의 명령어를 실행하여 kubernetes-bootcamp라는 이름의 deployment를 생성
그리고 이미지는 --image 옵션을 통해 pull이 되는 듯 하다. (gcr.io/google-samples/kubernetes-bootcamp:v1)
kubectl create deployment kubernetes-bootcamp --image=gcr.io/google-samples/kubernetes-bootcamp:v1
생성된 deployments를 확인하자
kubectl get deployments
우리가 만든 kubernetes-bootcamp 가 배포되었다!
배포가 되었다는건 Slave Node에 image가 가고, container로 떠서 실행중이라는 소리!
아래의 명령어로 연결되있는 pod를 확인하자! -o wide 옵션으로 넓게 보자

kubectl get pods -o wide
172.16.0.1 의 ip가 할당된것을 볼 수 있다!
Master Node의 API Server로 kubernetes-bootcamp deployment를 생성하라고 전달하면, Master Node의 API Server를 Consume하고 있는 Slave Node의 kubelet를 통하여 Pod를 생성하고 컨테이너를 배포한 것 같다.
# kubectl describe deployment/kubernetes-bootcamp
Name:                   kubernetes-bootcamp
Namespace:              default
CreationTimestamp:      Thu, 03 Dec 2020 10:33:39 +0900
Labels:                 app=kubernetes-bootcamp
Annotations:            deployment.kubernetes.io/revision: 1
Selector:               app=kubernetes-bootcamp
Replicas:               1 desired | 1 updated | 1 total | 1 available | 0 unavailable
StrategyType:           RollingUpdate
MinReadySeconds:        0
RollingUpdateStrategy:  25% max unavailable, 25% max surge
Pod Template:
  Labels:  app=kubernetes-bootcamp
  Containers:
   kubernetes-bootcamp:
    Image:        gcr.io/google-samples/kubernetes-bootcamp:v1
    Port:         <none>
    Host Port:    <none>
    Environment:  <none>
    Mounts:       <none>
  Volumes:        <none>
Conditions:
  Type           Status  Reason
  ----           ------  ------
  Available      True    MinimumReplicasAvailable
  Progressing    True    NewReplicaSetAvailable
OldReplicaSets:  <none>
NewReplicaSet:   kubernetes-bootcamp-57978f5f5d (1/1 replicas created)
Events:
  Type    Reason             Age   From                   Message
  ----    ------             ----  ----                   -------
  Normal  ScalingReplicaSet  33s   deployment-controller  Scaled up replica set kubernetes-bootcamp-57978f5f5d to 1
Deployment가 ReplicaSet 생성
# kubectl describe rs kubernetes-bootcamp-57978f5f5d
Name:           kubernetes-bootcamp-57978f5f5d
Namespace:      default
Selector:       app=kubernetes-bootcamp,pod-template-hash=57978f5f5d
Labels:         app=kubernetes-bootcamp
                pod-template-hash=57978f5f5d
Annotations:    deployment.kubernetes.io/desired-replicas: 1
                deployment.kubernetes.io/max-replicas: 2
                deployment.kubernetes.io/revision: 1
Controlled By:  Deployment/kubernetes-bootcamp
Replicas:       1 current / 1 desired
Pods Status:    1 Running / 0 Waiting / 0 Succeeded / 0 Failed
Pod Template:
  Labels:  app=kubernetes-bootcamp
           pod-template-hash=57978f5f5d
  Containers:
   kubernetes-bootcamp:
    Image:        gcr.io/google-samples/kubernetes-bootcamp:v1
    Port:         <none>
    Host Port:    <none>
    Environment:  <none>
    Mounts:       <none>
  Volumes:        <none>
Events:
  Type    Reason            Age   From                   Message
  ----    ------            ----  ----                   -------
  Normal  SuccessfulCreate  35m   replicaset-controller  Created pod: kubernetes-bootcamp-57978f5f5d-6rn4z
Replicaset이 Replicaset-Controller를 통해 Pod를 생성한다(Replica)
Slave Node 의 docker ps를 확인해보자
docker ps
k8s_POD_kubernetes-bootcamp~ POD가 생성되어있고, 그 위에 k8s_kubrnetes-bootcamp container가 생성되어 있다!! 아주 좋다.
View our app
Pods that are running inside Kubernetes are running on a private, isolated network. By default they are visible from other pods and services within the same kubernetes cluster, but not outside that network. When we use kubectl, we're interacting through an API endpoint to communicate with our application.
기본적으로 Pods는 private 네트워크 환경에서 돌아가기 때문에 같은 kubernetes cluster 안에서는 서로 접근가능하지만 외부에서는 접근이 불가능하다.
우리가 kubectl을 사용할 때 kubernetes cluster 내부의 API endpoint와의 통신을 통해 내부의 application의 통신이 가능하단다.
kubectl proxy위의 명령어를 실행하면 우리는 host pc 에서 kubernetes cluster API endpoint를 통하여 내부의 pods들에 접근할 수 있게 된다. 위의 명령어는 forground에서 돌아가기 때문에 취소하기위해 Ctrl + c를 입력해야한다.
kubectl proxy --port=8080 &위의 명령어와 같이 port도 직접 지정할 수 있고 &로 백그라운드로 실행 시 킬 수도 있다.
물론 끄기위해선 host pc의 ps -aux 와 같은 프로세스ID를 찾아서 종료해주면 된다.

새로운 터미널에서 kubectl proxy 실행

기존 터미널에서 curl을 통한 proxy 접근
아래의 명령어를 통해 APIServerAddress 및 port를 알 수 있다.
curl http://localhost:8001/api/
apiserver on control-plane in Master Node (in my case kube-master) 아래의 명령어를 통하여 현재 실행중인 POD_NAME을 오고
export POD_NAME=$(kubectl get pods -o go-template --template '{{range .items}}{{.metadata.name}}{{"\n"}}{{end}}')curl을 사용, kubectl proxy 서버를 통한 kubernetes cluster apiserver에 쏘기!
curl http://localhost:8001/api/v1/namespaces/default/pods/$POD_NAME/proxy/
??? 튜토리얼 그대로 따라했는데 에러가 뜬다...
처음에는 포트포워딩 문제인가 싶어서 Slave Node의 docker ps의 결과를 살펴보면

제대로 떠있는데 PORTS 부분을 보면 포트포워딩을 안해서 그런가? 라는 생각이 들었는데, api를 통해서 요청 시 default port가 80번으로 잡혀있는데 튜토리얼에서 제공받은 kubernetes-bootcamp container안에는 8080번으로 node.js가 설치되어있다고 한다.
control-plane apiserver를 통해 위의 curl을 날릴 때 아래와 같이 변경해서 보내보았다.
curl http://localhost:8001/api/v1/namespaces/default/pods/$POD_NAME:8080/proxy/
정상적으로 Hello ~ 를 출력하고있다!
docker ps 를 통해 출력된 정보의 PORTS는 host pc -> container 의 포트포워딩인데, 우리가 Master Node의 apiserver를 통해 api를 쐈을 경우 직접적으로 private network를 통한 POD_NAME에 해당하는 컨테이너로 direct access를 하기때문에 포트포워딩은 상관이 없었다!
내 머리속 상상도는 이러하다.
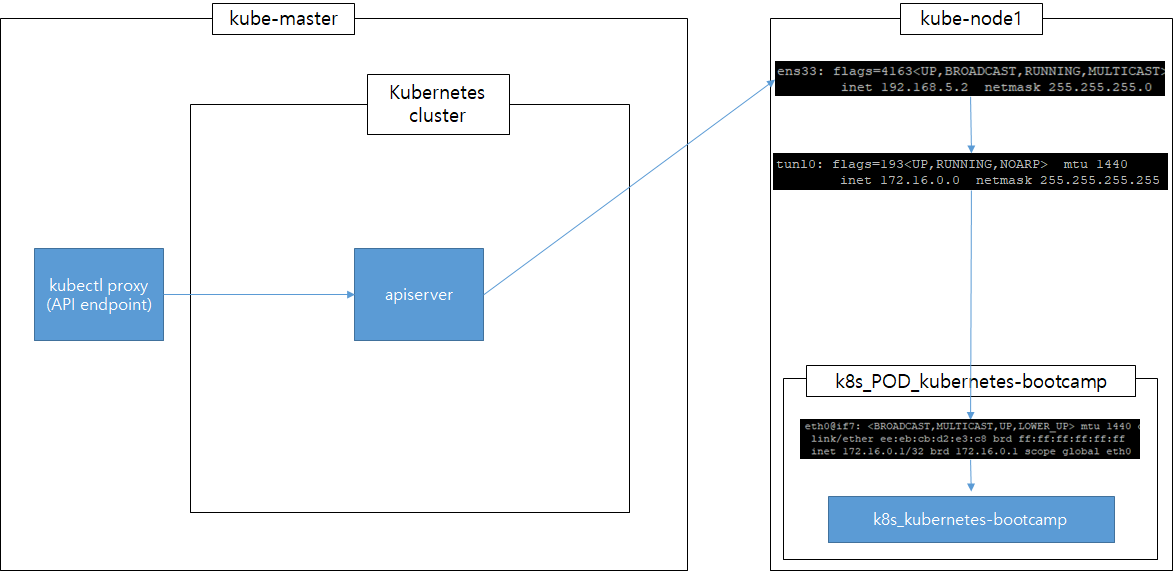
kubectl proxy 명령어를 실행해서 생성된 API endpoint를 이용해 cluster에 실행되어지고 있는 apiserver로 Kubernetes API를 사용하여 호출하면 Slave Node인 kube-node1에 host 네트워크 인터페이스 ens33이 먼저 받고 Calio plugin을 통해 생성된, tunl0(IP-in-IP Tunnel Interface) 가상인터페이스를 통하여 내부의 POD안 application에 전달하게 되는 과정인 것 같다.
그래서 docker ps를 통해 보여지는 container의 포트포워딩은 docker0라는 네트워크 인터페이스를 통하지만 우리는 tunl0 네트워크 인터페이스를 사용하기 때문에 PORTS가 상관 없었던 것이다.
아래를 참조하여 사전지식 얻었다.
Kubernetes Calico Plugin
Kubernetes Network Plugin인 Calico를 분석한다.
ssup2.github.io
kubectl logs $POD_NAME위의 명령어를 통해 해당 pod로의 log를 볼 수 있다.

kubectl exec $POD_NAME env
kubectl exec는 docker exec 와 같이 container에 명령어를 실행할 수 있다!
다만 kubectl exec [POD] [COMMAND] 는 deprecated 될거니까 [COMMAND] 앞에 --를 붙여서 실행하라고 한다. 미리미리 따라해주자.
kubectl exec $POD_NAME -- envkubectl exec -ti $POD_NAME -- bash
pod에 bash로 접근하여 server.js를 확인한 모습, 내부에 listen을 8080으로 받는걸 볼 수 있다.
후 이로써 Kubernetes Cluster 환경을 구성하고 Image 배포, container 실행을 해보았으며 외부에서 kubectl proxy를 통해 pod에 접근을 해보았다.
그러나 kubectl proxy를 통한 접근은 매번 우리가 proxy를 실행해주어야하는 번거로움이 있는데 이를 Service를 통해 해결할 수 있다고한다. 다음 챕터는 Service이다! 가자!
참고자료
kubernetes 정리
kubernetes는 배포, 확장 및 운영을 자동화하는 컨테이너 관리툴이다. kubernetes가 왜 필요한지에 대해서 알아보자. kubernetes없이 Docker를 이용하여 애플리케이션을 서버에 배포하고 운영 하려면 shell s
lng1982.tistory.com
'인프라 > Kubernetes' 카테고리의 다른 글
[Kubernetes] Service Cluster IP란? Kubernetes Network? Kubernetes iptables? (0) 2020.11.19 [Kubernetes] 쿠버네티스 설치하기 (5) - Using a Service to Expose Your App (0) 2020.11.18 [Kubernetes] 쿠버네티스 설치하기 (3) - Creating a cluster with kubeadm (0) 2020.11.13 [Kubernetes] 쿠버네티스 설치하기 (2) - installing kubeadm (0) 2020.11.10 [Kubernetes] 쿠버네티스 설치하기 (1) - Container runtimes (0) 2020.11.10